

|
Activity |
|
Description - |
|
1 |
| |
|
2 |
|
Learn to use the robot and control it through a cable controller |
|
3 |
| |
|
4 |
| |
|
5 |
| |
|
6 |
| |
|
7 |
| |
|
8 |
| |
|
9 |
|
Create a bump sensor to cause the robot to avoid obstacles |
|
10 |
|
Program robot to follow a plan using switches to input sequence |
|
11 |
|
Program robot to follow a plan using simple barcodes |
|
12 |
|
Use robot as a stopwatch timer |
This part of the web site will introduce you to the current range of Robokid activities. Please feel free to run the project in any way you see fit. We appreciate that teachers may want to run their own activities once they get some experience with the robot hardware. Don’t worry if you have problems, we will be available to help.
As regards the running of the project, our experience has been that the children
are very comfortable with the technology and are not intimidated by its content.
With the emphasis on “Curriculum for Excellence” we would see good opportunities
for the more technology savvy children to help groups that are having problems. The
area with the most likelihood of problems is the initial build. To help we have
a step-
Heriot-


All currently available documentation is now on the web and covers the first eight activities. More will be added in the coming weeks. Please check the web changes page for updates.
Initially, a full project manual can be downloaded HERE. The file is in “pdf” format
and can be read by any of a number of PDF readers -
|
—> |
|
—> | ||
|
—> |
|
—> | ||
|
—> |
|
—> | ||
|
—> |
|
—> | ||
|
—> |
|
|
| |
|
—> |
|
—> |
The project is split into a sequence of targeted activities. Associated with each activity is a set of resources as follows
1. Teacher notes with background information
2. Pupil worksheet (not all activities have a worksheet) – photocopy enough to distribute 1 per team
3. DVD describing the activity (not all activities have a DVD)
4. Additional documents
E.g. activity 1 has two fault charts; activity 3 has a shape template.
Each activity should be done in a session, where a session is between 45 and 60 minutes. However, these times are flexible and you may find that an activity spills over to the next time you do the project.
1. The class kit has an extra robot kit for you to play with. Later on, it can act
as a spare if any of the kits develop a fault. In one school, they used the robot
in an in-
2. Check that the DVDs can play on your equipment and that they can play with sufficient volume.
3. Ensure that the batteries have been charged for the first activity.
Parts of the project can be run in a classroom and parts in a hall or room with some clear floor space. It is difficult to generalise as classrooms vary from school to school. Competitions and driving activities really need to be done in a hall area, while construction and some of the art activities can be done in a classroom. One thing to note is that the robot does not work well on carpet, you should either use classroom desktops (can be small and lead to robots falling on the floor!) or vinyl/wood floor. The other factor that will influence where to run the different activities is the availability of video facilities. In the two pilot schools, Comely Park PS had SmartBoard facilities in each classroom which could display DVDs and a data projector in their hall (tricky to setup) while Bothwell PS used a mobile DVD player on a trolley that could be moved to the classroom or the hall.
It may be useful to have another adult helper with some of the activities, in particular for activity 1. As it is the first activity, the children tend to be quite excited and if there are problems then an extra pair of hands can be very useful. For example, in one of the pilot schools, a parent with an engineering background came in to help.
An essential aspect of our work is to evaluate the project. This is a requirement of our funding body, but, more importantly, will help us to develop the project material. There are three areas of assessment that we would like you to help us with
1. Numerical data.
- Number of pupils doing the project, number of hours spent on the project, etc. We have included a form to aid the collection of this data.
2. Reaction of the pupils to the project
- One of our pilot schools produced an assessment sheet. An evaluation sheet is included with this information pack.
3. Teacher evaluation.
- Because of the technical complexity of the project we are very interested in what teachers thinks about the project, the way we have designed the material, and the content. Again, an evaluation sheet is included.
We have included a full set of rechargeable AA batteries – sufficient for 4 per kit and some spares. Your class kit also includes sufficient chargers for all the class robots. The following points should be noted ::
- The batteries are supplied in a discharged state. You will need to charge them before the first session.
- Do not mix other types of batteries with the ones supplied with the kits. Especially,
do not mix with non-
rechargeable batteries. - If you find that the batteries are discharging very quickly, please contact Jim and he will arrange to send you replacements.
- The supplied battery chargers work best when the batteries are quite well discharged.
To make this easy, when the robot is powered-
on it will tell you if the batteries need charged. This will be shown as a little scrolling message on the number display. The three possible messages are ::
|
Message |
Displayed message |
Meaning |
|
1 |
robot |
Batteries are fine and pupils can use the robot. |
|
2 |
“bAt_lo”
for 20 seconds then “robot” message. |
Batteries are getting towards the end of their charge. The robot can continue to be used, but batteries should be charged for the next activity. |
|
3 |
“rEchArgE” |
Batteries are ready to be charged and the robot will not function. |
- The pupils will be told about these messages in the DVD for activity 2.
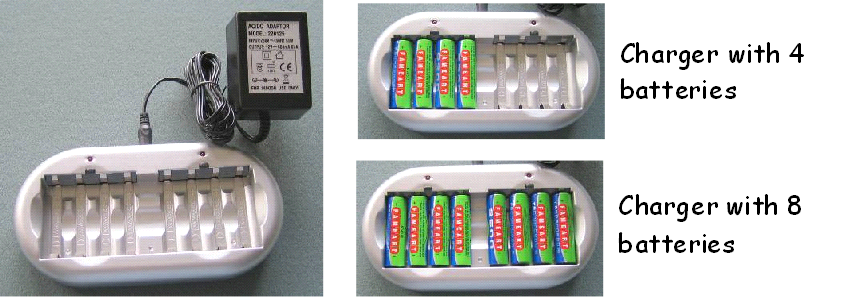
- Each of the supplied battery chargers can take 8 batteries at a time. You should only charge in units of 4 or 8. The battery charger shows where to place the batteries and indicates the correct orientation.
- The time for a full charge is about 8 hours. After 8 hours it will stop charging. This may be a problem as the charge time is longer than a school day. The chargers are rather basic and do not detect when the batteries are fully charged, but rely on charging for a fixed period of time. Therefore, each time you switch the charger off then on, it resets the timer and can cause the batteries to overheat.
- If you are not allowed to charge the batteries overnight, then charge the batteries for as long as you can, say 9am to 3pm. This will give the batteries sufficient charge to run for quite a long time.
- Batteries vary and their ability to hold charge diminishes over time, therefore it is difficult to give exact figures on how long the batteries will last. Under ideal conditions they will last for about 2 to 3 hours of continuous use. Therefore, you should not need to charge the batteries very often.
- We have included a mains distribution block to allow all the chargers to be plugged in at the same time
- If the batteries have to be charged too often then they may be faulty. Please send me an email and I will send you replacements.
Please do the following when you are finished using the project
- Children/teachers to complete the evaluation sheets. (Example forms HERE)
- Any photographic and video material from the activity work would be much appreciated. Please can you check that you have permission from parents for us to use this footage as it may be used in project publicity.
- Check that each robot kit has
A built robot (please DO NOT dismantle) with four batteries
A switch controller, cable and screwdriver
Also include any bags that have survived the project
- Check that the class kit has
A set of battery chargers, charger power supplies and mains block.
Switches and light sensing components (as many as possible)
Remnants of consumable materials (tape, pens, etc)
Send a “project complete” email and we will arrange to have the kits collected.
We now supply the video material in DVD form and on YouTube. In future we hope to also provide it on TeacherTube.
|
|
Method |
Notes |
|
1. |
Videos hosted on YouTube |
The most common video delivery method on the internet.
|
|
2 |
Video files available as a standard DVD disk, playable on a DVD player. |
Supplied with the kit. |
Back
Back
Back
Back
Back
Back
Back
Back
Back