

|
Mode |
Name |
Notes |
|
r? |
General robot modes |
“r0” à “r7” |
|
r0 |
Modes using the switch controller to guide the robot |
|
|
J0 |
Forward/backward/spin mode |
Left switch controls the left motor and the right switch controls the right motor |
|
J1 |
Stop/slow/fast curve/spin forward mode. |
No reverse in this mode. |
|
J2 |
Compound mode. Switch controller acts a little bit like a joystick of a car driving
program on an X- |
The left switch controls forward/backward movement and the right switch controls left and right movement. |
|
r1 |
Simple activity modes |
|
|
A0 |
Run forward |
|
|
A1 |
Run backward |
|
|
A2 |
Spin right |
|
|
A3 |
Spin left |
|
|
r2 |
Bump modes |
|
|
b0 |
Line bump |
Bump perimeter formed with black tape |
|
b1 |
Bug line bump |
Bump perimeter formed with black tape |
|
b2 |
Wall bump |
Uses switches to detect bump against solid objects |
|
r3 |
Follow modes |
|
|
F0 |
Follow black tape lines |
|
|
F1 |
Follow light source |
|
|
r4 |
Programming modes |
|
|
P0 |
Input distance commands from keys |
Programming using the robot switches |
|
S0 |
Run stored sequence |
|
|
S1 |
Input sequence from keys |
|
|
S2 |
Save sequence to internal memory |
|
|
S3 |
Get sequence from internal memory |
|
|
S4 |
(test mode) |
|
|
P1 |
Input sequence from a black/white strip |
Inputting a program with a barcode card |
|
S0 |
Run stored sequence |
|
|
S1 |
Scan a strip of commands |
|
|
S2 |
Save sequence to internal memory |
|
|
S3 |
Get sequence from internal memory |
|
|
S4 |
(test mode) |
|
|
r5 |
Sketch/drawing modes |
|
|
S0 |
Draw a spiral |
|
|
S1 |
Spirograph mode |
|
|
r6 |
Lab modes |
|
|
L0 |
Stopwatch mode |
|
|
r7 |
Distance modes |
|
|
d0 |
unused |
|
|
d1 |
unused |
|
|
d2 |
Calibrate the wheel distance sensors |
Necessary before first use of “r4/P0” mode |
|
|
|
|
The modes are shown on the small two character 7-
|
Mode |
Description |
Switch sequence |
Notes |
|
J0 |
Forward/backward/spin driving with switch controller |
3A |
Used in activity 1 |
|
J1 |
Forward/curve/spin driving with switch controller |
2A_D_A |
Used in activity 2 |
|
J2 |
Forward/backward/left/right driving with switch controller |
2A_2D_A |
|
|
|
|
|
|
|
A0 |
Drive forward for a period of time |
A_D_2A |
Used in activity 5 |
|
A1 |
Drive backward for a period of time |
A_D_A_D_A |
|
|
A2 |
Spin right for a period of time |
A_D_A2_D_A |
|
|
A3 |
Spin left for a period of time |
A_D_A_3D_A |
|
|
A4 |
Run test sequence |
A_D_A4_D_A |
|
|
A5 |
Run demo sequence |
A_D_A5_D_A |
|
|
|
|
|
|
|
b0 |
Detect and reverse away from lines made from black tape |
A_2D_2A |
|
|
b1 |
Same as “b0” but avoid lines in a manner more like a mouse or a bug |
A_2D_A_D_A |
|
|
b2 |
Detect obstacles with bump switches and reverse away. |
A_2D_A_2D_A |
|
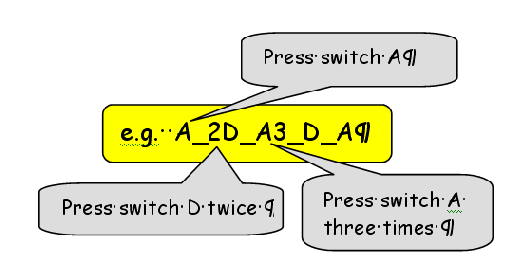
Read these switch sequences as follows
Evaluating the project is vital for us and our main funding agency, the EPSRC (The Engineering and Physical Sciences Research Council). This will help us to justify the money and time spent on the project and will provide evidence help keep the project going beyond 2010. There are two options
- Use your own evaluation process.
- Use our evaluation sheets -
available here.
We are happy with both approaches.
On completion of the project please put the evaluation material in the class kit plastic box. Also, feel free to email me any additional comments and suggestions. The more feedback we get, the more we can develop the material.
|
►
|
FAQ (Frequently Asked Questions)
|
|
►
|
|
►
|
|
►
|
|
►
|
|
►
|
|
|
Interdisciplinary Study Planning Sheet (Bothwell Primary School)
|
Heriot-