

|
1.1 | |
|
1.2 | |
|
1.3 | |
|
1.4 | |
|
1.5 | |
|
1.6 | |
|
1.7 | |
|
1.8 | |
|
1.9 | |
|
1.10 | |
|
1.11 | |
|
1.12 | |
|
1.13 |
|
2.1 | |
|
2.2 | |
|
2.3 | |
|
2.4 |
|
|
2.5 |
|
|
2.6 |
|
|
2.7 |
|
Heriot-


|
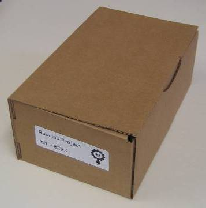
Your pupils should work in teams of 3 and each team will get a robot kit that they will build, test, and use in a sequence of activities. One for each group of three pupils e.g. a class of 32 pupils will get 11 kits. Each kit is supplied in a cardboard box of size 26cm*11cm*17cm. (Storage required for these boxes)
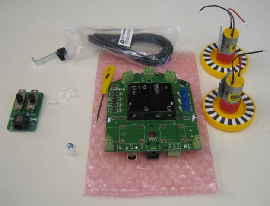
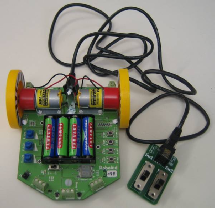
Kit includes 1 robot circuit board 2 motors with wheels 1 screwdriver 8 rivets to fix motors to circuit board 1 pen holder unit 1 front skid dome nut and screw 1 controller with two switches 1 cable to connect controller to robot 3 bump switches
|
 —>
—> —>
—>
|
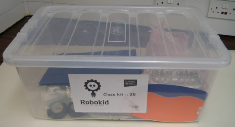
Each class is supplied with a class kit
Kit consists of One robot kit for teacher (same as pupil kit) Battery chargers (sufficient for class) Rechargeable batteries for the class 1 mains extension socket 1 DVD disk to cover activities 1 set of Berol pens for use with robots 1 pack of silver wire links to be used in Activity 1 test mode 1 pack of brown wire to be used as object catchers at the front of the robot 2 rolls of drawing paper 2 rolls of black 19mm tape Sufficient light sensors for robots Set of spare components |
|
The project can be run during any term. The three session times are 1. October to December 2. Jan to March 3. April to June
A project booking sheet is available here. |
|
At present there are 8 activities, with more being developed. You may choose as many or as few activities as you like. Depending on how often you run the project in a week, the project can run from between 2 and 6 weeks. |
|
We plan to supply the full kit a minimum of two weeks before you intend to start. |
|
Here for details of the current range of activities. |
|
The robot should not be run on carpet or outdoors. Parts of the project can be run in the classroom and parts in a hall or room with some clear floor space – vinyl or wood. It is difficult to generalise as classrooms vary from school to school. Competitions and driving activities really need to be done in a hall area, while construction and some of the art activities can be done in a classroom. The other factor that will influence where to run the different activities is the availability of DVD facilities. Some schools have SmartBoard facilities in each classroom which can display DVDs while others used a mobile DVD player on a trolley that could be moved to the classroom or the hall. |
|
Many of the 20 phase II schools ran the project once per week in an afternoon slot. However, one or two have suggested that they would in future plan to run it over a shorter period with more than one session per week. |
|
Each robot kit comes with FOUR rechargeable AA batteries and access to a battery charger. On delivery, the batteries will need to be charged in time for the first session. On a full charge, the robot should work for three to four sessions. However, this is very dependent on the amount of usage and the time between sessions (batteries naturally discharge with time). The batteries should only be recharged when they are at least half discharged. There are two ways to ensure this
Please note that the supplied batteries are high power and will take about 8 hours to recharge. |
|
We are very happy for you to suggest other ways in which the equipment can be used. The only requirement is that you let us know so that we can include your ideas for the future. |
|
Our project funders are very keen that we evaluate the project. The teacher’s kit will include some evaluation sheets, but we would happy for you to provide additional evaluation material that highlighted the pupils’ reaction to the project and their attitudes towards technology. Any pictures and video clips would be much appreciated. We would also ask you to note the time spent on the project by the class and to pass this data to us at the end of the project. |
|
There are no costs associated with the project. All kits and materials are provided for free. |
|
You are required to return the equipment to Heriot- |
|
Because we designed and built the robot from scratch we were able to include features and facilities that we thought would be useful. In electronic engineering the word MODE is often used in place of the word feature. The switches are used to get the robot into the correct mode for the appropriate activity. |
|
The robot has many modes (features) and more are being added. As part of the design we had to find a cheap way to allow a user to get the robot into the required mode. The compromise was to use FOUR switches, FOUR LED lights and a TWO character display. Therefore a user will initiate a series of switch presses to activate the mode. Statements such as “A_2D_A” are shortcut descriptions to the switch sequence.
A_2D_A = “press switch A once, then press switch D twice, then press switch A once.
Switch A is often referred to as SW-
A full list of the relevant switch sequences is given in the Support page. |
|
Like all component, some batteries are better than others. They all age with time and can give problems. If your batteries seem to be discharging very quickly then try to give them a FULL charge after running them down. Doing a couple of full discharge/charge cycles can often refresh the batteries.
If they continue to give problems then please let me know and I will send replacements. |